Showing posts with label gear. Show all posts
Wednesday, September 7, 2016
Imersion Neoprene protection for apnea fins
Sunday, August 23, 2015
Fins
Introduction
Fins are an important part of spearfishing gear, I would say that they are, with the Mask, (Snorkel/Tuba), and the Spearfishing Apparatus, the most important gear. Any other gear you could live without and still spearfish (omitting laws & personal comfort). The fins are what will allow you to move in a fast, safe and fluid manner in the water; they also allow you to dive down in an easy way. Without fins a strong current could take you away, you could not move around under water easily to hunt and to dive down you would need a weight attached to a rope and a boat to allow you to go down fast and bring up the weight after each dive or a bottom anchor and a rope to climb down for each dive. Generally speaking your down time would be horrible and it would be very hard to spearfish like this.
Types of Fins
There are many types of fins:
- Snorkling
- SCUBA
- Freediving/Spearfishing
- Underwater hockey
- ...
The most common are the top three, in that order, I will not mention the forth type.
Scuba Fins
They vary in length and width and may have other gadgets/shapes to them; They are however usually wider to overcome the resistance from all their equipment and rather short to be less cumbersome. The footpocket and the blade are permanently attached together in the fabrication process. The blade is made of some sort of plastic. Power transfer is not optimal with the open heal and they can be painful without booties or socks. This is not an issue for scuba divers as they don't really need to swim optimally, they are too heavy and not streamlined enough for that anyways and they have a large external oxygen reserve so usually they do not worry so much about using the O2 in their blood optimally (I am simplifying things here). These fins are not very good for spearfishing (just as a reminder I exclusively speak of apnea spearfishing in my blog).
Snorkeling Fins
Snorkeling fins are light & flexible closed heel fins:
They vary in length and width and may have other gadgets/shapes to them. They are usually less wide and longer than Scuba fins, they are also softer. The footpocket and the blade are permanently attached together in the fabrication process. The blade is made of some sort of plastic. This type of fin is usually meant to be used without socks but you can use socks if you want. You can use these fins for spearfishing, I have used them for several years (my most recent being the Beuchat X-Voyager; this type of fin is cheap and if you get one with the right blade stiffness and long enough it is OK for shore/hole/reef/rock spearfishing. They may not be optimal but it will allow you to practice and perfect your technique.
Freediving/Spearfishing
These fins are long closed heel fins:
They vary in length but are much longer than the other fin types mentioned above:
The blade can be between 65cm and 85cm in length. The reason they are so long is that the blade's structure is linearly graded (thicker on one end and gradually getting thinner until the other end). This creates a leaver effect which give the fin a ratio between the energy the freediver has to give and the effective energy the fin generates is greater than any other fin type. This means that you use less O2. The footpocket is much stiffer than for other types of fins; this is to maximize power transfer (leg to blade). The footpocket and the blade can either be are permanently attached together in the fabrication process or separate. The separate type can be fixed permanently or modular; modular fins allow you in theory to buy a footpocket that fits you well/that you like and use blades from different brands, different materials, different stiffness, etc:
In practice not all blades fit with all brands, some footpockets have features that means only their blades will fit (Salvimar):
or make it difficult to fit other blades (Beuchat). Omer, SeacSub & Pathos seem to be the most generic. The blade can be made from different materials, I will talk about that later. They are usually meant to be used with socks but you can use them with socks if you want (if they fit and do not hurt your feet).
The blade can be between 65cm and 85cm in length. The reason they are so long is that the blade's structure is linearly graded (thicker on one end and gradually getting thinner until the other end). This creates a leaver effect which give the fin a ratio between the energy the freediver has to give and the effective energy the fin generates is greater than any other fin type. This means that you use less O2. The footpocket is much stiffer than for other types of fins; this is to maximize power transfer (leg to blade). The footpocket and the blade can either be are permanently attached together in the fabrication process or separate. The separate type can be fixed permanently or modular; modular fins allow you in theory to buy a footpocket that fits you well/that you like and use blades from different brands, different materials, different stiffness, etc:
In practice not all blades fit with all brands, some footpockets have features that means only their blades will fit (Salvimar):
or make it difficult to fit other blades (Beuchat). Omer, SeacSub & Pathos seem to be the most generic. The blade can be made from different materials, I will talk about that later. They are usually meant to be used with socks but you can use them with socks if you want (if they fit and do not hurt your feet).
Freediving fins are however the most expensive types of fins, even the cheapest are more expensive than the expensive snorkeling fins. They are of course the best type for Spearfishing. I will exclusively talk about this type of fin from now on.
Parts
Fines are made up of two main parts, the footpocket:
and the blade:
The footpocket can either be open heel:
which are usually used with booties or socks The other type is closed heel:
Which are used it or without socks (but never booties).
The blade can be made of different materials (see below) and it can have some extra options (see below)
Footpockets
Footpockets can be made of one or several bonded materials; having different materials allows the footpocket to be reinforced in some places and softer in others with the aim of improving the mechanical aspects and comfort. For example the Cressi Gara Modular has a different material on the sides (harder) and in the middle (softer). You need to choose a footpocket that fits you well with socks, you can always use a fin keeper if they are a bit too big without the sock if you with to be able to not use socks at some point. The reason for using socks is more than just for thermal comfort, these types of footpockets are usually harder than snorkeling footpockets and they tend to have "sharp" edges which can cause a lot of pain. You could always trim or round them off a bit I guess if you really do not want socks, I have not tried. The footpockets have the part where your foot goes in, an opening in the front for the toes and to let water drain out, and "tendons", these are the long strips that extend on the front part. These have slots inside, usually in the shape of a 'T' for modular footpockets:
But not always:
The type without 'T' slots have to be glued with the blade. The blade slides in the tendon slots before sliding into the bottom slot of the footpocket:
The tendons come in different lengths and stiffness, this is important as it will directly impact the fin performance. For example a very stiff tendon and a soft fin means that only half the blade flexes correctly. I am not a specialist blade/tendon stiffness coupling so I will not be able to help much there, the best is to ask in specialized forums. Also, if the footpocket is too soft then energy is lost in the stretch, a bit like using a bicycle with suspensions in the city (you loose energy to the suspension). One last aspect, the most important, is the fit. It is hard to know in advance if it will fit correctly without actually trying it in water (with a blade in). First there are narrow footpockets such as:
- Beuchat
- Cressi
- SeacSub
and wide:
- Pathos
- Omer
- Mares
- etc
The pathos being particular in the fact that you can put on a smaller size (with or without socks) and heat them slowly with a hair drier and they will actually mold to your foot (including the distinctive left/right match). I have never tried this but you can find videos and instructions on the internet. If you cannot find your fit or you want dual use (with or without socks), you can get finkeeps to help:
An often overlooked aspect is the bottom, if you hunt around rocks this part can be useful so make sure it is sturdy enough and has some sort of ribbing to keep you from slipping:
Blade
The blade is the other main component of the fin, it can typically be made with (in order of ascending price):
- Thermoplastic
- Fiberglass
- Carbon fiber
- Kevlar
It has a narrower end (with or without an angle) that slides into the footpocket. The other end can have different shapes depending on the manufacturer/model:
Thermoplastic Blade
Thermoplastic blades are like tanks: heavy but indestructible; they are also the cheapest type. They have their place, I don't think you should just to carbon because you think it is better (because it isn't necessarily better). While they are heavier, thus adding fatigue to your legs, they are usually still good. They are robust which is important to some people, it depends how you hunt. Thermoplastic blades will outlast other types, they can be scratched, bent, etc, much more than other types. They do have a "usage/bending memory" though, this means that the more they are bent in one way they will retain that angle a little each time.
Fiberglass Blade
Fiberglass (sometimes called fiber composite) blades are lighter and more responsive (they snap back better) than thermoplastic blades. They are also more expensive and more fragile than plastic. They are, with carbon fiber blades (see below) real linear graded blades. Plastic blades often use ribs to give the same effect but composite blades rely on the material itself. They do not have the negative type of memory like plastic blades have but have less of a positive memory than carbon blades.
![]() |
| "Ice" Fiberglass blades |
![]() |
| Colored, can have patterns too |
Carbon fiber Blade
Carbon fiber blades are lighter and more responsive than fiberglass blades. They are also the most expensive and fragile of blade types. They tend to snap (brittle) in an instant if you over-power them and if you scratch them they can delaminate. These should be exclusively used for boat based (blue water) spearfishing since you have no contact with rocks/coral. This type of spearfishing also fits well with this blade because the blade's full potential can be used. Carbon fiber has an "initial/resting state memory" meaning they will always want to return to their initial (flat) state; this means that it helps the freediver a little each time.
Just remember not to jump in the water from the boat with your fins on because they will probably snap.
In general I would suggest:
- If you are a beginner, cash strapped, or hunt close to rocks/coral and do not want to be careful with your blades, get thermoplastic.
- If you do mixed spearfishing (rocks + some blue water) or are careful with your fins, and you are not cash strapped, you can get Fiberglass blades.
- If you solely do blue water spearfishing and money is no object, get carbon blades.
I do not recommend carbon blades if you do not practice blue water spearfishing. Some people swear by carbon no matter how you spearfish but I think this is wrong; each trade has its tools.
Kevlar Blade
Kevlar is a robust material with amazing tensile strength but it is a material which is quite hard to work with. Because of this, even though I have seen 100% Kevlar blades in the wild, it is mostly used in conjunction to other fibers, usually carbon. This makes it easier to work with and adds durability to carbon blades. It is typically either
- directly woven (crisscrossed) with carbon, this creates an average blade and is the least interesting combination. These are often called "Carbon/Kevlar Hybrid" blades.
- used as the core sandwiched in between carbon layers, this adds shear stress resistance to keep them from snapping. The carbon being on the outside layers the carbon fibers themselves do all the actual work. I will call these CKC blades.
- used to protect a carbon core by sandwiching it in between Kevlar. This is used in an attempt to still have a lightweight and reactive fins but also resist high abrasion or abuse around rocks. This variant is they type that Danny (see comments section) calls "Rock Hoppers". I will call these KCK blades.
Composite Blade Stiffness Comparison
I found a nice comparison of various composite materials used to make blades:
![]() |
| Source: Penetrator Fins |
You can read the whole post here. Also of interest is this page and this page. Although they are not specific to fins they give good information on the above composites.
Angle
Fins can have an angle going from 0° (flat) to about 30°. The "standard" for fins that have an angle is 15°-22°. The angle helps you do two things, it offsets the natural angle of your ankle & foot so that your kicks push more water and it makes the freediving negative buoyancy free fall smoother (when you no longer float up and your body glides through the water). If the angle is too high, above 25° I think, you will cut through the water instead of pushing it so you will be less efficient. Here are some examples:
Stiffness
The blade stiffness is an important aspect that must be carefully analysed. The softer a blade is the less tiring it will be to fin with at the surface but the harder it will be to go up to the surface from the bottom. The harder the blade is the more tiring it is to fin long distances on the surface but the easier it is to go back up from the bottom. The standard blade stiffnesses are:
- Soft
- Medium
- Hard
some brands add to this:
- Very Soft (LD/Long Distance)
If you have very strong legs you can go hard, but most people will use medium as an all around stiffness. Very soft fins are sometimes labeled "LD" for Long Distance by some brands, soft fins are very useful if there is strong current or if you have to fin long distances. It really depends on how and where you spearfish and how strong your legs are; as I said above you can choose medium if you are not sure or if you want something for most situations.
Rails
There are two types of rails:
- Tendon rails: for the 'T' slot in the tendons (thus at the base of the blade):
- Water channeling rails: channels the water better on the blade (thus at the end of the blade)
Thermoplastic blades either have this built in or not, fiberglass or carbon fiber blades have this as extras. The tendon rail is obligatory if you want modular fins, if not you can glue the blade in the footpocket and tendons. The water channeling rail is very useful to help you achieve optimal finning. Imagine pouring water on a blade without channeling rails, the water will spill off in every direction. Now do the same with the rails on, the water will be channeled in one direction. I am not sure if the channeling rails modify the mechanical properties of the blade much. In theory it should depending on the stiffness of the material used although I have not seen any tests on this. I would think that the gain from having them is largely superior to the loss but then again I have not seen them being used by many makers.
Technique
The finning technique is very important, some techniques are:
- Frog kick: imagine a frog swimming; this is used mostly by SCUBA divers in caves or wrecks so they do not kick up sediments
- Dolphin kick: imagine a dolphin swimming; this is like if you had a mono fin
- Flutter kick: this is the kick swimmers often use, spearfisherman/freedivers use a variant of this
- Bicycle kick: imagine how your legs move when you ride a bicycle; this is mostly used by SCUBA divers and should not be used by Freedivers/Spearfishemen!
Spearfishermen/Freedivers using freediving fins use a type of Flutter kick with slow, regular, stiff-legged kicks. If you try to Bicycle kick you will waist a lot of energy and not be very efficient. SCUBA/Snorkeling fins are shorter and stiffer so even with Bicycle kicks you move fin, but not so with Freediving fins!
Conclusion
Fins are indispensable, it is important to match you needs to the fins you buy as the price can climb quickly to $500 and above. As stated above, if cash is an issue then get either thermoplastic or longer snorkeling fins, they will be fine. I have a pair of "longer" snorkeling fins for traveling light or rock fishing in rougher waters and a pair of Breier 760B 'SG' fiberglass fins for everything else.
As always, if you have any questions or remarks, please don't hesitate to leave a comment below!
Saturday, July 4, 2015
Gear Maintenance
Introduction
Spearfishing gear is subject to salt, sand and other elements of nature, proper maintenance is needed if you want to keep it functioning optimally for a long time. One of the main two culprits to watch out for is salt and direct sunlight, it will kill some of your gear in a matter of weeks or months if you do not remove all traces of salt from your gear and keep it out of direct sunlight.
The most important thing to do after after each time you use is to rinse your gear thoroughly with fresh water. This can be done with a garden hose, in the shower (using a removable shower head) or in the bathtub. If I am going out again next day I usually just rinse it real well with the hose/shower head and let it dry (out of the sunlight). If I will not use it for a while, I do as described above and then I fill the bathtub with lots of fresh water and put in all items that sink and let them soak well for several hours (changing the water at least once). It is important to make sure the gear is well dried before long storage.
I will go through the list of gear most spearfishermen have and share what I do to keep it in a good shape.
Speargun
The speargun is the most complex gear you own, it is also the most important item (you can get away with not having anything else if the need be). Spearguns can oxidize due to salt and air (or even simply the contact of some of the metals that they are made of (e.g. aluminium + stainless steel), the mechanisms can lock up due to oxidization or sand, wooden spearguns can warp, bands/slings can degrade, etc. As mentioned in the introduction the most important thing to do after a hunting session is done is to rinse it well. Special care must be given to the mechanisms (trigger, line release, reel), I try to inject as mush water inside it via the multiple openings as I can. If you put it in the bathtub make sure the spear is on the speargun so it sinks and I let it soak well for several hours. I also make sure I rinse in between where the slings are in contact with anything to remove anything that could help to degrade them during storage. Also important is to make sure it is thoroughly dried to reduce any oxidization. It is also a good idea to take the spears out of the mechanism for longer term storage. Once in a while (I do this every two or three years) you can clean/oil the trigger and line release mechanisms. If you are not comfortable taking apart your speargun then just inject some WD-40 (not too much!) inside the mechanism using the "straw"). Be very careful not to get any on the bands/slings as it eats/degrades rubber (think of what you learned in sex-ed about Vaseline and condoms, same issue!).
Slings/Bands
I have pretty much summed it up on these in the post above (speargun), but I would also add that sunlight is very bad for rubber. It is recommended to store them in a cool dry place out of light. Some people use silicon grease to keep them supple and others go as fare as putting them in a zip-lock bag (make sure there is not humidity inside) and store them in the refrigerator. Some say that the ideal temperature is between 10°C and 25°C and should be stable. Ozone is also bad for the rubber so watch out for this, ozone more prevalent in hot & sunny periods and in smog.
Shaft/Spear/Points
Cheap shafts & tips are made with "standard" stainless steel. This is great for oxidization but not so good for hardness (they deform/warp easily). The good ones are made of a different type of stainless steel, often 17-4PH hardened stainless steel (or something similar). This type of steel resembles SAE 304 in terms of corrosion resistance, which means it is not as "rust proof " as the cheaper stuff. A thin layer of oxidization can form on it but it should not corrode like non-stainless steal. To keep it rust free I do the following:
- Rinse it well with fresh water
- Dry it well
- Put some WD-40 on a rag or paper towel and rub it well against the metal
The idea with step 4 is to deposit a thin layer of WD-40 on the metal to protect it. WD-40 also removes any oxidization that could have already started. When I get ready to use it I rub the metal with a clean rag or paper towel to remove it. As mentioned in the speargun section of this post I recommend storing the shaft off the speargun so any oxidization from either does not contaminate the other.
Reel
If you have a reel make sure you rinse it well. I like to let it soak in the tub so the salt leaves the mechanism and the line. I also inject water where there are small spaces. Let it dry thoroughly, this can take a while with braided line.
Knife
The knife, if not made from Titanium, can rust also. Some knives have a layer of Teflon on most of the blade to prevent oxidization but in some places such as the cutting edge or the region where the blade goes in the handle, rust can form. As with all the gear rinse and dry well, but also use some silicon grease to protect the blade when you are not using it.
Mask
The mask sounds like a no-maintenance item and it mostly is, you can just rinse it well. I like to clean the inside with some toothpaste as mentioned in my "Mask fogging up?" post. I usually let the toothpaste dry so it protects the inside from any oils and when I want to use it I just let it soak in the water a bit and shake the toothpaste out.
Neoprene (wetsuit, socks, gloves, etc)
The wetsuit requires special care too. I rinse it very well and let it dry out of sunlight. UV light degrades rubbers and Neoprene is essentially rubber with nitrogen bubbles in it. It is important to dry it inside and out; if you do not mold could settle in and this is very hard to remove (and it stinks!). I have read that you can wash a wetsuit if it starts to smell (mine never have). Some people just use a little laundry detergent (the kind you use to hand wash wool/silk) mixed with water in a tub. Just rub the neoprene well, let it soak some, rinse well and dry. I have even read some people sick it in the washing machine on the delicate cycle (the one for wool) and let it run (using the same type of laundry detergent). I am not sure I would try, I guess it depends on if the first method failed, but if you do try make sure the temperature and the spin is low (it should be if you have a dedicated wool cycle). Never, I repeat, never use the drying machine! To store a wetsuit is is best to lay it out flat in a cool dry place out of light. You could also try one of those wetsuit hangers but since apnea wetsuits are more elastic than scuba wesuits you could get some deformation from the pull of gravity. If you have an open-cell wetsuit, try to keep the rubber from touching itself to prevent it from sticking. You could for example stuff it with cloth.
The rest of the gear
The rest of the gear is essentially minimal maintenance, just rinse & dry well and store in a dry dark place.
Conclusion
If you rinse your gear well after every use and store it correctly it should last you much longer than if you do not. As with everything is is a question of inverting time to care about your investment but sometimes circumstances make it harder to do it well. In this case just stick to the minimal maintenance which is: rinse & dry well and keep out of sunlight.
As with all my posts, if you have questions or comments please don't hesitate to write below in the comments section!
Labels:
gear,
knife,
maintenance,
mask,
reel,
spear points,
speargun,
tips,
wetsuit
Wednesday, April 2, 2014
Spear Points
Introduction
There are many different types of tips/points for a shaft, I will try to give as much information as I can about as many as I can here.Spear shaft types
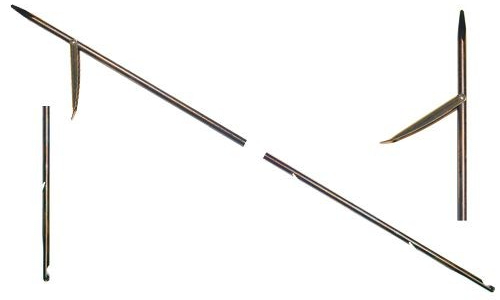
There are two main types of spear shaft tip types, this will dictate what kind of points you can use- Fixed : the tip/point is fixed on the shaft, it is in integral part of the shaft and cannot be changed. If you damage the spear tip you have to replace the whole spear or find a way to fix it (e.g. resharpen a point). The advantage is that the spear is more streamlined and damages the fish less (smaller hole); they are really thinner than the threaded shafts. The disadvantage is that you cannot just swap out damaged points nor can you adapt the point to the type of fish. These are also called "Euro" spears/shafts because they are the default on Euro guns. Here is an example:
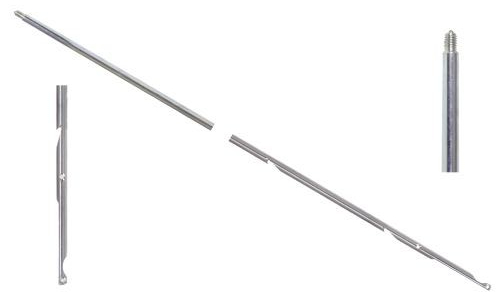
- Threaded : the shaft has no tip but is instead threaded. This allows you to change the tip, either when it is damaged or to adapt it to the fish/hunting style. The advantage is the flexibility, the disadvantage is that it is less streamlined than a fixed shaft (it makes a bigger hole), it damages the fish more and it can twist off. The advantage is the flexibility, you can choose between tridents of flopper tips, different types of points, single floppers, multiple floppers, etc. Good tips can be the price of a Euro spear so keep that in mind, the flexibility come with a price. Threaded shafts are popular on US spearguns. Here is an example:
Tips/Points
There are two main types of tips:- Standard flopper/flopperless tips: the are the type you will encounter most of the time, they are essentially a point and will penetrate the fish well. They are made to puncture a hole in/through the fish and if there is one or more floppers these will anchor in the fish to keep it from escaping. They have the added advantage of being fast and to travel far and relatively straight.
- Tridents: You will see these on smaller spearguns usually that are used to hunt in holes/caves most of the time. The reason for this is that due to their shape they are less hydrodynamic and travel well only on short distances. They don't shoot as strait over longer distances also and if the gun is too powerful they would be completely damaged if they hit a rock. Since with a less powerful gun in close quarters you don' t have much force, the trident is great as it immobilizes the fish due to multiple trauma. They are also more forgiving to bad aim but make multiple holes in the fishes flesh.
Standard flopper/flopperless tips
These are caracterized by:- The number of floppers
- The point itself
Floppers
This is a type of barb that is mobile on an axis, a point/spear can have different number of floppers:
- No flopper: This is usually only for freeshaft setups (where the spear is not connected to anything via a line. The spear is just just to penetrate the fish and the hunter either has to be sure he immobilizes the fish by hand of by the shot itself. It doesn't make much sense to have a flopper for this type of spearfishing since the fish would swim away with your spear, having no floppers of barbs means it will usually fall out. The hunter can have several spears and chase the injured fish and shoot it multiple times. You usually take a fixed tip spear with a single flopper and then you either take the flipper off or cut it off at the flopper (the flopper hole can make it weaker) and make a point again.
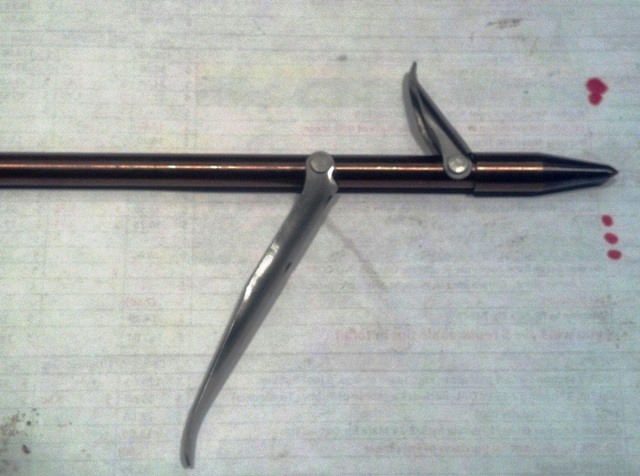
- One flopper (Hawaiian): only one flopper, if it breaks you only had one so the fish gets away. Hawaiian means that it opens downwards, the idea being it will deploy with gravity's help. You can use a little rubber band to keep it closed while hunting if you want, although this may cause it not to deploy on soft fish, thus defeating the purpose. Influences the trajectory in one direction some say. One flopper tips are the default on Euroguns, they look like this:
- One flopper (Tahitian): only one flopper, if it breaks you only had one so the fish gets away. Tahitian means that it opens upwards, the idea being it will not deploy with gravity's help meaning you can poke it in holes and such without it getting caught. Influences the trajectory in one direction some say. One flopper tips are the default on Euroguns, they look like this:
- Two floppers: this type has two floppers, either symmetrically or not, these are common in the USA. Having two floppers means you have a "backup" flopper if one breaks, if one doesn't engage or if one flopper closes while the fish struggles. It also doesn't modify the trajectory since it is balanced. A symmetric double flopper point has two floppers attached to the same flopper hole, so you get one on each side like this:
A non-symmetric double flopper point has two holes, one flopper in each hole and they are on opposite sides horizontally. These are specialty tips that help in cases where you hunt soft and hard fish, in soft fish both will (normally) engage/penetrate and in harder fish both may or only one may depending on the toughness and distance. They share the other traits the "normal" double flopper point has. This is what they look like (the one on the right is a custom made point by Linghunt Engineering Inc.):
- Three floppers: these are ame as two floppers but with three floppers. I have never tried one of these, they should behave like their 2 flipper cousins but with two backups and to hold better to fish. They are quite rare, I have never seen one myself in real life, they look like this:
Point Types
Here are some popular point types:
- Bulletpoint (aka Rockpoint): These are the standard type, they are like a pencil point. They are all-around/general points and are also good when hunting around rocks/reefs as they are less fragile than the other two types. They don't penetrate as well in tough fish though. Here is an example:
- Tri-cut: they have three flat sides cut into the point, the edges are often sharpened. They have great penetration in tough bone or skin but are more fragile and will be damaged if they hit rocks. These are used in bluewater hunting on big fish, here is an example:
- Arrowhead: these are the rarest of the three, they have a shape like an arrowhead (hence the name) and have sharpened edges. They share the same pros and cons of the Tri-cut points, they have their use for tough small to medium sized fish, here is an example:
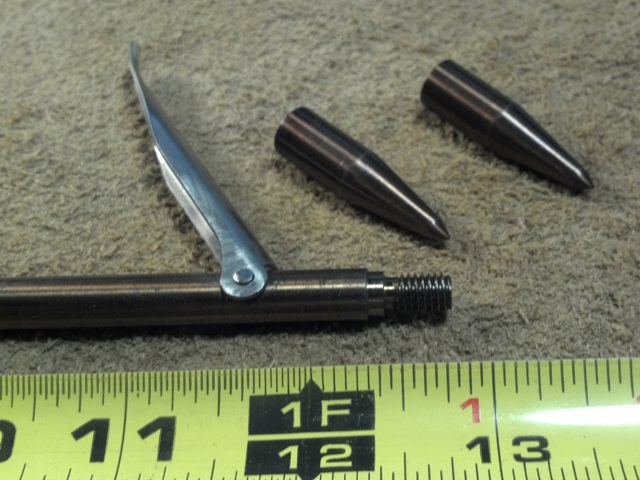
Some points, usually threaded, allow you to literally change the tip of the point also. This means that you can not only change the point type depending on the conditions, the fish, etc, but also the tip of that point in case it gets damaged/worn out from hitting rocks. This is a nice idea but I have never tried those out. Here are some examples (the one on the right is a custom made point by Linghunt Engineering Inc., the same as the non-symmetric double flopper point shown above):
Tridents
- Standard Tridents: Can have 3 or sometimes 4 points which are thinner which are not aligned. The points have non-moving barbs. These are good on smaller (and maybe medium) fish and smaller guns. The usage where they really shine is to catch a fish in a hole, be aware though that anything else in its path will stop the trident, something that is less of an issue with flipper spear points. They slow down the spear very quickly, so at a distance of more than a meter they are not really useful. They look like this (the one on the left is for Lionfish):
- Flat Tridents: Can have 3, 4, 5 or 6 points which are thinner and aligned. The points have non-moving barbs or small floppers. These are good on smaller (and maybe medium) fish and smaller guns. Due to their flatness they are not as convenient in holes as the non-flat type. They share all other traits with the above type but they do have one advantage however which is that they are much more forgiving to bad aim :-). The plastic and stainless steel ones are not as robust as the all stainless steel ones, they tend to break f they hit rocks at high speed. Flat tridents look like this:
- Paralyzing tips: Used often on pole spears, this is
like taking a bunch of straight thin (often thinner than for tridents) metal
bars and bunching them together at the bottom and sharpening the tips
(with or without barbs). The idea is that they will paralyze the fish with multiple insertion points and the side forces tighten the hold as the tip goes into the fish. Useful for
smaller (and maybe medium) fish. These also slow down the spear quickly and are fragile. Different models have a different number of tines, three seams to be the optimal amount. They look like this:
Threaded specific
Threaded points come in three types:- Standard/Non-Rotating: these are the standard threaded tips. They are not expensive and you find them everywhere, literally, if you buy a threaded point t will probably be one of these. The big downside is that they can unscrew, for example if the flopper is inside the fish and the fish rotates (this has happened to me!). They can even unscrew without a fish's help (also happened to me). You can use thread tape/nylon to help it stay put a bit but you have no guarantee it will. Tridents are exclusively of this type. Here is an example:
- Rotating: these are only made (to my knowledge) by JBL International and A.B. Biller. They are much more expensive than regular points but they don't have the issue with unscrewing themselves but their footprint is a little bigger (since you have the rotating mechanism) compared to some non-rotating points and they may be more fragile although I have never had this issue. One downside to them not unscrewing when the arrow rotates is that if it gets stuck somewhere you can't just unscrew it (thus loose the point) to save your shaft (also happened to me). Here is an example of what they look like:
- Break-away/Slip-tip: this is an old mechanism, they come either with or without floppers, without being the oldest type. The tip itself is disconnected from the part that screws onto the shaft, they are connected with a wire or string. When the point goes into a fish, it disconnects and stays inside (or on the other side if it went through). This helps a lot especially when the flesh is soft, a regular shaft and point can tear the flesh and the fish can get away, with a breakaway this is less likely to happen. The downside, other than the cost, is the fragility and stability. Fragility because if it hits a rock it can break beyond usability, stability because it can fall apart if there is some slack and it is harder to put together. Pole spear slip-tips are made to be more robust than speargun slip-tips; they can handle rocks better since they have more engagement of the stem on the head and have thicker wall thickness on the head. Here is an example of the two types I have spoken:
The thread size varies depending on the spear diameter, most are M6 (6mm) or M7 (7mm) but check before! There is also the pitch to take into account, this is the spacing in between two threads. A better way to difin the correct thread would be to use the pitch in conjunction with the diameter: 6mm-1, 7mm-1 , 8mm-1.25, 5/16"-24. You can buy adapters in case you have a large cache of points for one size though. An adapter does add a new point of failure and will make the footprint bigger, here are two adapter examples:
This wraps up this post on speargun points/tips, I hope it will help someone out. If you have any remarks or questions please don't hesitate to write a comment. I would like to thank John martin for his comments and contribution.
- M6 female to M7 male:
- M7 female to M6 male:
This wraps up this post on speargun points/tips, I hope it will help someone out. If you have any remarks or questions please don't hesitate to write a comment. I would like to thank John martin for his comments and contribution.
Subscribe to:
Posts (Atom)